Raspberry Pi · robotics · beginner guide · autonomous movement
Getting Started with Raspberry Pi Robotics: Your First Autonomous Robot
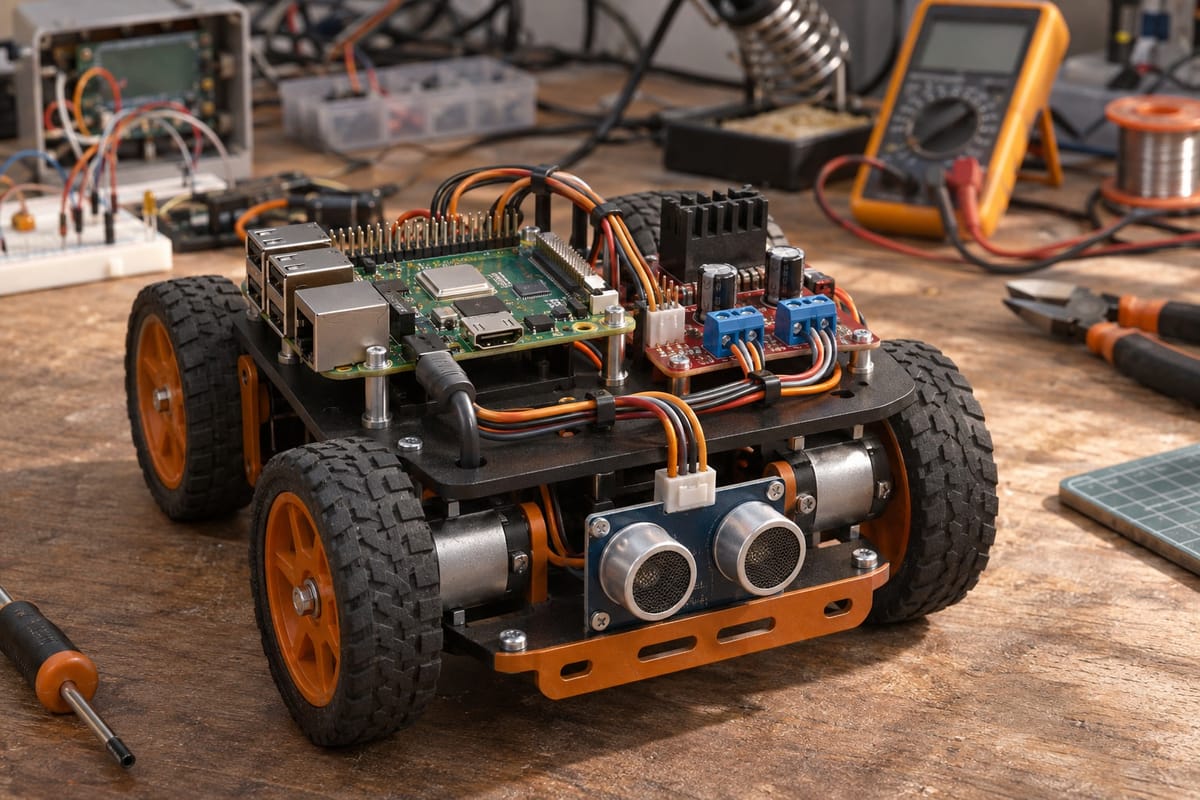
Building your first Raspberry Pi robot feels like a big leap, but the path from components to autonomous movement is more straightforward than most beginners expect. This walkthrough takes you through every step: choosing the right hardware, connecting motors and sensors, writing your first control program, and watching your creation move on its own.
What You'll Need
Start with a Raspberry Pi 4 Model B (2GB or 4GB RAM) rather than older models—the extra processing power matters when you add sensors later. You'll also need a motor driver board (L298N is reliable and cheap), two DC geared motors with wheels, a robot chassis kit, jumper wires, and a power source. For power, a USB battery pack (10,000mAh or higher) works well for initial projects; when you're ready to optimize, check our guide on battery selection for robotics.
Don't forget the basics: a microSD card (16GB minimum, Class 10), a laptop or desktop for initial setup, and an ultrasonic distance sensor (HC-SR04) for obstacle detection. Most chassis kits include mounting hardware, but keep a small screwdriver set and zip ties nearby.
Setting Up Your Raspberry Pi
Download Raspberry Pi OS Lite from the official Raspberry Pi website and flash it to your microSD card using Raspberry Pi Imager. The Lite version skips the desktop environment, saving resources for your robot's control code. During the imaging process, enable SSH in the advanced options and set your Wi-Fi credentials so you can access the Pi remotely once it boots.
Insert the card, power up the Pi, and SSH into it from your computer. Run sudo apt update && sudo apt upgrade to get the latest packages, then install Python GPIO libraries with sudo apt install python3-rpi.gpio python3-gpiozero. The gpiozero library simplifies motor and sensor control with clean, beginner-friendly syntax.
Wiring Motors and the Motor Driver
The L298N motor driver board takes power from your battery and sends controlled signals to the motors based on commands from the Raspberry Pi. It has two channels (A and B), each controlling one motor. Connect your left motor to the Motor A terminals and the right motor to Motor B.
For the Raspberry Pi GPIO connections, wire the driver's IN1 to GPIO 17, IN2 to GPIO 18, IN3 to GPIO 22, and IN4 to GPIO 23. Connect ENA and ENB (the enable pins) to GPIO 24 and GPIO 25 if you want speed control via PWM; otherwise, bridge them to the 5V rail with the included jumpers for full-speed operation. Connect the Pi's ground (any GND pin) to the motor driver's ground—this shared ground is critical for reliable signal communication.
Writing Your First Movement Code
Create a new Python file on your Pi: nano robot.py. Start with a simple forward movement test. Import the gpiozero library and define your motors using the GPIO pins you wired:
from gpiozero import Motor from time import sleep left_motor = Motor(forward=17, backward=18) right_motor = Motor(forward=22, backward=23) left_motor.forward() right_motor.forward() sleep(2) left_motor.stop() right_motor.stop()
Run it with python3 robot.py. Your robot should roll forward for two seconds, then stop. If one side moves backward or doesn't move at all, swap the motor wires on that channel or reverse the forward and backward pin assignments in the code.
Once forward movement works, add turning. To turn left, stop the left motor and run the right motor forward. To turn right, do the opposite. For a sharper turn, run one motor forward and the other backward:
left_motor.backward() right_motor.forward() sleep(1)
This spins the robot in place. Experiment with different sleep durations to calibrate 90-degree and 180-degree turns.
Adding an Ultrasonic Sensor for Obstacle Detection
Mount the HC-SR04 sensor on the front of your chassis. It has four pins: VCC goes to the Pi's 5V pin, GND to ground, Trig to GPIO 4, and Echo to GPIO 5 (through a voltage divider—the Echo pin outputs 5V, but the Pi's GPIO pins tolerate only 3.3V. Use a 1kΩ and 2kΩ resistor in series between Echo and ground, connecting the Pi's GPIO to the junction between them).
The sensor works by sending an ultrasonic pulse and measuring how long it takes to bounce back. In gpiozero, this is just a few lines:
from gpiozero import DistanceSensor sensor = DistanceSensor(echo=5, trigger=4, max_distance=2) *distance = sensor.distance 100**
The distance property returns meters, so multiply by 100 for centimeters. If the distance is less than 20 cm, your robot should stop and turn to avoid the obstacle.
Building Your First Autonomous Behavior
Combine movement and sensing into a simple obstacle-avoidance loop. The robot moves forward, checks for obstacles, and turns away when it detects something too close:
while True: ** distance = sensor.distance * 100 if distance < 20: left_motor.stop() right_motor.stop() sleep(0.5) left_motor.backward() right_motor.forward() sleep(0.7) else: left_motor.forward() right_motor.forward()**
This is autonomous movement: the robot makes decisions based on sensor input without waiting for commands. Place it on the floor, run the script, and watch it navigate around furniture and walls.
Troubleshooting Common First-Build Issues
- Robot moves but veers to one side: Motors rarely have identical speeds. Use PWM to adjust the duty cycle on the faster motor: left_motor.forward(0.9) reduces the left motor to 90% speed.
- Motors don't respond: Check your shared ground connection between the Pi and motor driver. Verify GPIO pin numbers in your code match your physical wiring—use gpio readall to see the Pi's pinout.
- Sensor readings are erratic: Ensure the voltage divider is correct and the sensor is mounted firmly. Loose wiring or vibration from the motors can cause false readings.
- Robot stops after a few seconds: Your battery pack may not supply enough current. The L298N draws significant power under load; use a pack rated for at least 2A output.
What to Build Next
Once obstacle avoidance works, add line-following with infrared sensors, or mount a camera module and experiment with OpenCV for visual tracking. You can also explore more advanced topics like comparing US vs China robotics components to find the best parts for your next project, or dive into motor encoders for precise odometry.
The jump from stationary Pi to autonomous robot is smaller than it looks. With a motor driver, a handful of sensors, and a few dozen lines of Python, you've built a system that perceives its environment and acts on what it learns. Every robotics project beyond this one builds on these same foundations: sensing, deciding, and moving.
Explore more robotics guides and find the components you need in our shop.
Sources
- GPIO Zero Documentation — GPIO Zero